Start here
After the opening sequence, choose BEGIN on Prologue — Crash Site, then POWER UP on First Light. Tap the junction explanation to continue. The board begins at 0/2 POWERED and MOVES 0.
Read the controls, follow the real example and compare the result before trying your own run.
Play Dead Moon Relay →A ManyPlay browser walkthrough · Checked . Screenshots below show the actual game; cover illustrations in the catalog are presentation artwork. Who publishes these games?
Verified opening-board solution
After the opening sequence, choose BEGIN on Prologue — Crash Site, then POWER UP on First Light. Tap the junction explanation to continue. The board begins at 0/2 POWERED and MOVES 0.
The shown board has lamps in the upper-left and upper-right cells, a reactor at bottom center, a horizontal straight conduit directly above it and a tee immediately above that. An elbow sits below each lamp. Use these tile relationships rather than pixel coordinates.
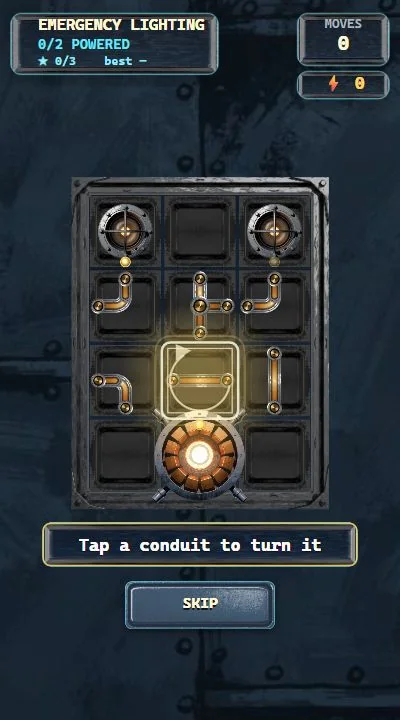
Rotate the straight conduit directly above the reactor once. Power reaches the tee and the right lamp: MOVES 1, 1/2 POWERED.
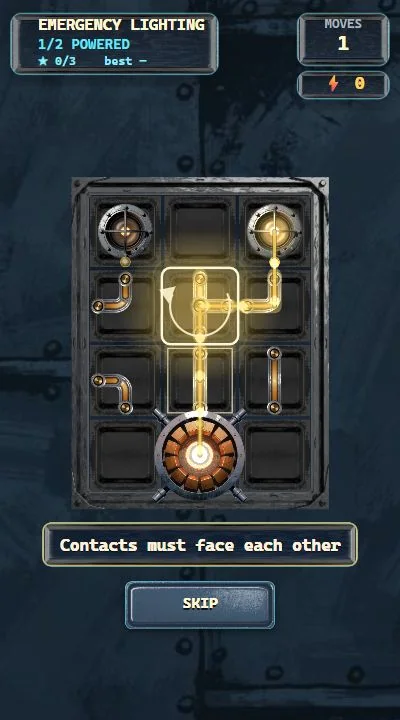
Rotate the central tee once so its contacts face left, right and down. The right lamp stays powered. The left branch still has a mismatched elbow: MOVES 2, 1/2 POWERED.
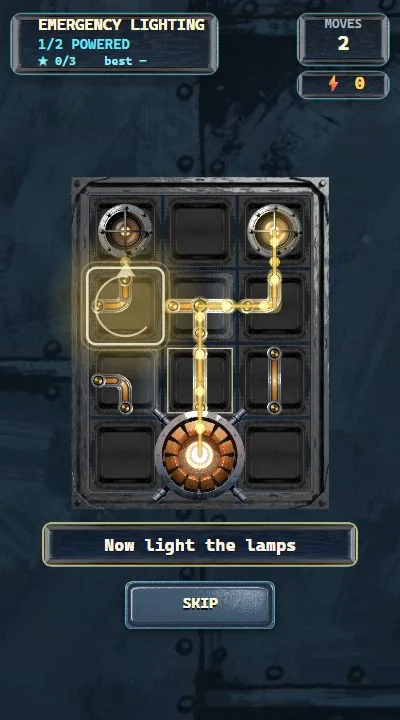
Rotate that elbow once so its contacts face up and right. Both lamps now connect to the reactor. The game confirms SUBSYSTEM ONLINE with Moves 3 and Optimal 3.
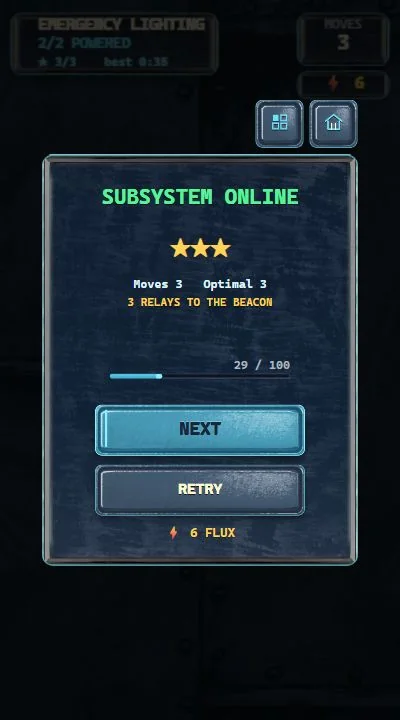
The first rotation supplies the network; the second creates the missing branch; the third joins that branch to its lamp. The unused lower-left elbow and lower-right straight tile do not need to be connected to satisfy this particular briefing. This is a complete solution to First Light, not the whole campaign.
The tee now points toward it, but the elbow below that lamp still faces the wrong horizontal direction. Both sides of the shared edge must have a contact.
No. This briefing asks for two lamps, and the verified solution leaves two spare conduits unused. Later boards have their own targets and constraints.
Later chapters introduce fixed tiles, one-way diodes, fuses, boosters, bridges, converters and multiple networks. Trace constrained pieces before flexible corners. The campaign is untimed and includes mission briefings, progress, challenge and leaderboard menu entries; the opening-board result does not verify every later mode.
Report a changed rule or control. Browser and Android editions can differ; the checked date describes this walkthrough, not a new game release.